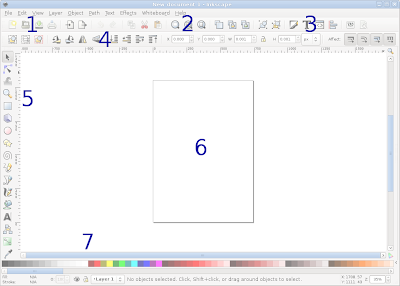
The numbered list below high lights each of the numbered tools in the image above.
- New Document, Opening, Printing & Importing

Tools from left to right: New, Open, Save/Save As, Print, Import, and Export
Inkscape has the ability to open and save a wide variety of file types: svg, PDF, Adobe Illustrator (ai), and more.
Inkscape can also send files directly to the printer.
Inkscape can import even more file types that it can open.
Inkscape can only export one file type - portable network graphic (png). - Zoom tools

Tools from left to right: Zoom to selection, zoom to all objects, and zoom to page.- The first tool allows you to zoom so that what you currently have selected fills the screen.
- The second tool zooms so that you can see everything that has been drawn. This can be handy if you are trying to find a missing object.
- The last tool zooms so that your page fills the page.
- Useful dialogs

Dialogs from left to right: Stroke/fill, text, XML, and alignment. - Quick transformations and in-layer ordering

Tools from left to right: Rotate 90 counter clockwise, 90 clockwise, mirror along the vertical axis, mirror horizontal, move to back, move back, move up, and move to front. - Drawing tools
 Select & Transform
Use to move objects around and change their size and rotation. You can also do a few distortions such as skewing.- Edit Path
This tool allows you to readjust key points within an object called nodes. - Tweak
Manipulate objects by pushing them around. - Magnifying glass
Use this tool if the keyboard shortcuts for zooming in and out aren't enough. - Square/Rectangle
- 3D Box
- Circle/Ellipse
- Star/Polygon
- Spiral
- Freehand
- Bezier curve & straight line tool
Bezier curves are based on points and how they affect a line. The line drawn does not necessarily pass though the point that controls what a bezier curve line looks like. - Calligraphy
- Fill
- Text
- Diagram Connect
- Gradient edit
- Eye Dropper
- Drawing area
The drawing area is all of the white space in the center of the screen referred to as the canvas. The box in the center is a page on the canvas. Because Inkscape is a drawing program not a desktop publishing program such as Scribus, Quark, Adobe InDesign, or MS Publisher, you only get one page to work on. - Color palette

There are two main things to think about with the color palette the fill and stroke. The fill as the name implies is the color inside of an object and the stroke is the outline color. In the image above you can see that with the current tool that is selected I don't have a fill or stroke color selected because N/A appears instead of a color.
A lesson that will briefly introduce you to the majority of the tools shown here.
No comments:
Post a Comment